

The “Magic Rescue Drive” Every Windows 11 User Needs
We like to think of our computers as reliable companions, always ready to answer the call. But now and then, a bad update or a sudden power outage can corrupt the inner workings of Windows 11. When that happens, you might turn on your machine only to be greeted by a blank blue or black screen and a computer that refuses to boot up.
And Windows 11 indeed has more ways to recover from disaster than any previous version of Windows, with System Reset options and the new Point-in-Time System Restore feature. But if Windows becomes severely corrupted, you still may not be able to start your computer easily.
A friend of ours recently went through a rather scary situation. Her computer refused to boot up after a powerful summer electrical storm. Fortunately, she didn’t have to jump through hoops and spend hours trying to get her computer started, and she didn’t have to haul her machine to a repair shop or pay a technician hundreds of dollars to repair it.
Nope… all she had to do was open her desk drawer, grab her “magic rescue drive” (a USB thumb drive), plug it in, and let it repair her computer’s corrupted system files.
And the reason she was able to do that was that she had created a Windows Rescue Drive long before the trouble started.
What is a Rescue Drive?
Many people automatically assume a backup will save them if something like a major catastrophe happens to their computer. They think that standard file backups (like saving photos and their personal documents and files to a cloud drive or an external hard drive) are enough. While that does protect your files and pictures, it doesn’t back up the system files that make Windows run. If the operating system itself breaks, your computer won’t boot up, and you can’t access those personal files anyway.
This is where the magic rescue drive comes in. It takes a standard, inexpensive USB flash drive and copies the foundational blueprint of Windows 11 onto it, along with built-in emergency repair tools. If your computer ever experiences a system failure, this little magic rescue drive acts like a self-contained repair kit. You plug it in, and it forces the computer to wake up, diagnose the issue, and fix the broken files without touching your personal data.
How to Create Your Own Magic Rescue Drive
Setting this up takes about fifteen to twenty minutes, requires zero technical skill, and costs very little (or nothing if you have a 16 GB flash drive lying around);
We recommend using a brand-new 32 GB flash drive to create the rescue drive; a new 32 GB flash drive costs around $15. But you can also reuse a 32 GB (or larger) flash drive you have on hand. Make sure there is nothing important on it, because Windows will erase the drive during this process.
Plug the USB drive into your computer. Type RECOVERY DRIVE in the taskbar search and click the app that appears.
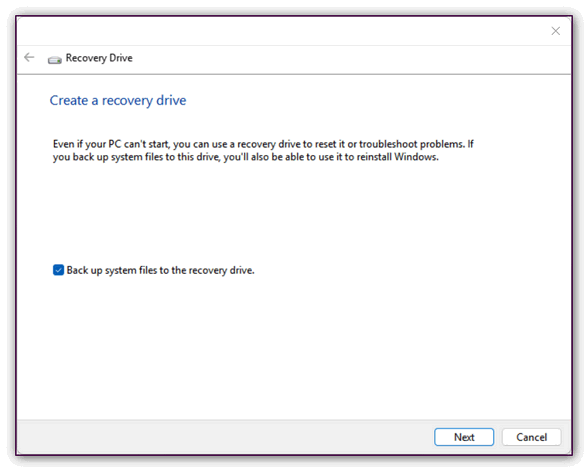 A window will pop up asking if you want to create a recovery drive. Make sure the little box next to “Back up system files to the recovery drive” is checked. This is the most important part because it tells Windows to copy its emergency blueprint.
Click Next.
Select your plugged-in USB drive from the list on the screen, click Next, and then click Create. Now, go pour yourself a cup of coffee. The computer will spend the next fifteen minutes or so copying everything to your magic rescue drive.
Label It and Put It Away
Once the computer says the drive is ready, click Finish and safely unplug the USB stick from your machine.
Take a small piece of tape or a sticky label and write “Windows 11 Magic Rescue Drive” on it, then put it in a safe place. You will likely never need to use it—but if a day ever comes when your computer refuses to boot up, you will be very glad you spent the time preparing this”magic” rescue drive.
THANK YOU!!!
Just wanted to advise that when I attempted to create this Rescue Drive, I recieved a message that a “flash drive with at least 32GB” was required. I didn’t get the option to click “Next” as it was grayed out. So perhaps a larger jump drive is required (at least for my tablet).
We will change this to a 32 GB flash drive to cover all scenarios. Thanks for the heads up. You can buy a brand name (Sandisk) 32 GB USB Flash drive for $15.00 at Amazon, comparable prices at Walmart. Non-name brands are cheaper.
Is it necessary to also make a Windows 11 installation media USB or does the “Magic Recovery Drive” replace it?
It doesn’t replace it, they are 2 different animals. For 95% of computer emergencies, your “Magic Recovery Drive” is the ultimate insurance policy and completely replaces the need for a standard installation USB.
I put in a 32g b drive, but I got the message that I had to put in one at least 32 gb. I couldn’t hit continue. What’s up with that?
Drive was not empty or capacity was misrepresented.
It’s brand new, straight out of the package. Does SanDisk come with less than stated gb’s?
Not normally. I don’t know Leslie. 32 GB of Flash Drive spaces is roughly 30GB usable. If your computer stores a whole lot of info – much more than normal then you’ll need to try a 64gb drive.
I put in brand new and different manufacturers, 32G flash drive & a 64G drive and each time recieved a message saying that a USB drive of at least 32G was required and didn’t allow me to proceed
Almost all new 32GB and 64GB flash drives come pre-formatted in a format called FAT32 or exFAT. Because of the way digital storage math works, a factory-formatted “32GB” drive actually only shows up in Windows as about 28.8 GB to 29.4 GB of usable space.
When the Windows 11 Media Creation Tool checks the drive, it looks for a strict, literal 32.0 GB of usable space. If it sees 29.4 GB, it assumes the drive is too small, and throws that exact error message you’re seeing.
The 2 Ways to Fix It
You have two options to bypass this, but Option 1 is the easiest and most reliable.
Option 1: Buy a 128GB Flash Drive and BE SURE
Because a 128GB drive will still have well over 110GB of usable space after the factory math deduction, Windows 11 will instantly accept it without throwing rejecting it. They usually only cost an extra $10, and it saves you from having to mess with complex formatting workarounds.
Option 2: Format the 64GB Drive as NTFS First
If you want to use the 64GB drive you already have, you need to force Windows to look at the space differently by formatting it to the NTFS file system before opening the rescue tool.
Plug the 64GB drive into the PC.
Open This PC (File Explorer).
Right-click on the flash drive and select Format.
Under File System, change the drop-down from FAT or FAT32 to NTFS.
Click Start. (Note: This will wipe anything on the drive, which is fine since it’s brand new).
Once it’s finished, close the format window and try running the Windows 11 Rescue/Media Creation tool again.