

How to Block Almost All Ads on Windows 11 by Changing Your DNS Settings – It’s Easy!
Last week, we featured an article on using AdBlock’s DNS servers to block ads on Android phones, and it works great. You can read that article here.
Now we will show you how to use the same method to block ads on your Windows 11 PC. Using an Ad-blocking DNS is one of the most effective and safest ways to block ads, tracking, and telemetry across your entire operating system, including the ads inside many Windows apps, because it stops the connection before it even reaches your browser or app.
Here is a simple, step-by-step guide on how to implement an ad-blocking DNS on Windows 11.
What is DNS Blocking? Is it Safe?
When you type a website (like `example.com`), your computer asks a Domain Name System (DNS) server for the website’s IP address.
An Ad-blocking DNS provider maintains a huge list of known tracking, telemetry, and advertising server addresses. When your computer requests the address of an ad server, the ad-blocking DNS responds with “Nothing” or an internal address (such as `0.0.0.0`), effectively blocking the ad request without slowing down the main content.
This method is extremely safe because you are only changing a network setting; you are not installing any software, touching your Windows Registry, or modifying core Windows files.
We will use AdGuard’s DNS servers for this tip. AdGuard DNS is one of the most popular and reliable free ad-blocking providers. So, let’s go!
First, Access Network Settings
1. Press the Windows Key + I to open Settings.
2. Navigate to Network & Internet on the left side.
3. Click on your active connection type (Wi-Fi or Ethernet).
Next, Edit DNS Server Assignments
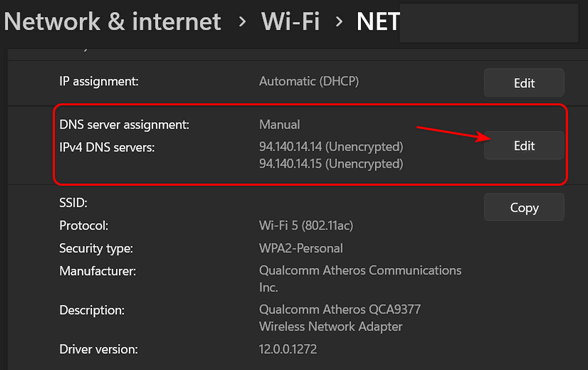
1. On the connection details page, scroll down to DNS server assignment.
2. Click the Edit button.
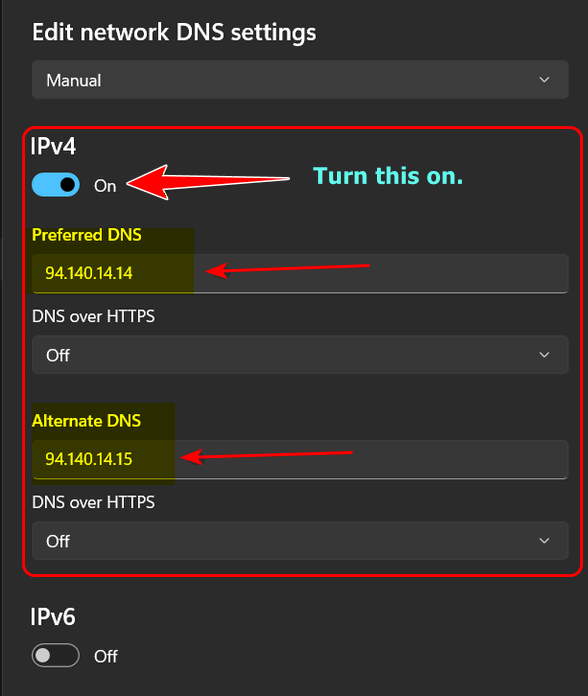
3. In the pop-up window, change the setting from Automatic (DHCP) to Manual.
4. Toggle the IPv4 switch on.
Enter the AdGuard DNS Addresses
Under the IPv4 section, enter the following DNS addresses:
Preferred DNS 94.140.14.14
Alternate DNS 94.140.15.15
OK, Now, Let’s Save and Verify
First, click Save. Then test it. Verify the ad blocking by visiting a site you know to be very ad-heavy. You should notice that web pages (and even some Windows apps ) no longer display advertisements.
We hope you found this tip useful!