

Let’s Give Your Windows 11 PC a Cloudeight Tune-up
OK, this tip is not for everyone. If you love notifications popping up at the bottom of your screen or you can’t live without the Windows 11 transparency and animation effects, then you won’t like this tip. However, if you want to increase your privacy, tune up your Windows 11 PC for responsiveness, and you’re willing to give up some aesthetics, forego notifications, and increase your privacy, then keep reading!
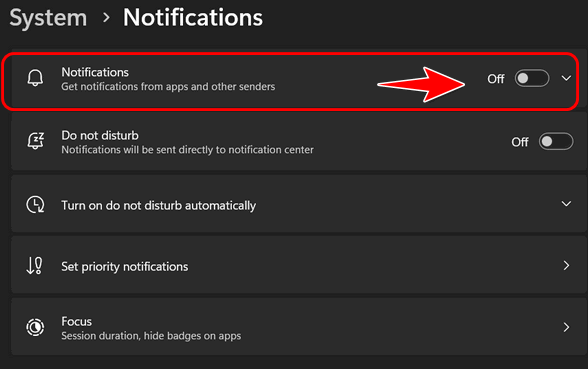
Turn off Notifications
This step is easy to do and won’t affect anything unless you can’t live without those notifications popping up from the taskbar. Me? I can live without them, and Notifications do use computer resources. If you don’t use them or pay attention to them, turn them off. It’s easy:
Open Settings (Windows key + I)
Click on System, then click on Notifications and turn the switch to the Off position.
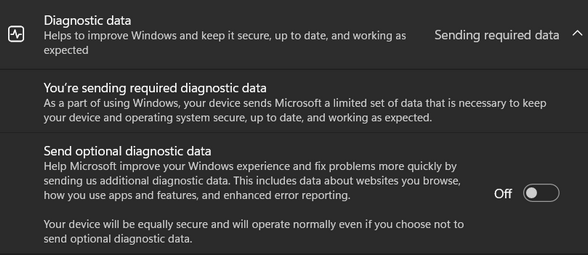
Increase performance and privacy by turning off “Send optional diagnostic data.”
Microsoft loves it when users leave this setting turned on. They get an enhanced view of how you use your computer and what you do on your computer. They don’t need to know, so to enhance your privacy and get a small performance boost, turn this setting off.
Open Settings > Privacy & security. Click on Diagnostics & feedback and turn the switch next to “Send optional diagnostic data” off.
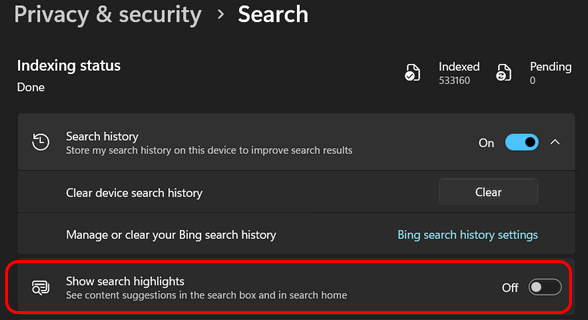
Turn off “Search highlights”
While you’re there in Privacy & security, scroll down to “Search” and turn off “Search highlights.” Search highlights are nothing but ads displayed in your taskbar search box. Unless you like goofy little pictures in your search box, you won’t miss a thing by turning Search highlights off.
Turn off Transparency effects and Visual effects.
Press the Windows key + U to access “Accessibility”. Then click on Visual Effects.
Turn off both Transparency effects and Visual effects.
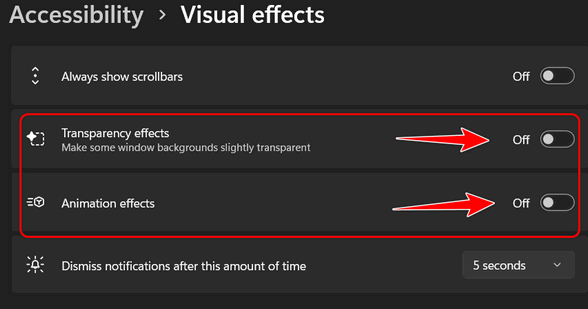
Turning these two settings off will make Windows 11 look less fancy. But you will get increased performance as a trade-off. I’ll take performance over beauty every time.
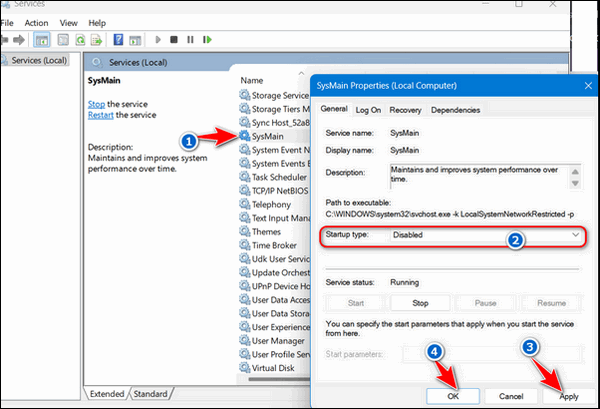
Turn Off SysMain (AKA SuperFetch)
SysMain in Windows 11, formerly known as SuperFetch, analyzes your PC usage to pre-load frequently used applications into RAM for faster launch times. However, it can cause high CPU and disk usage, especially on modern systems with SSDs, where its benefit is minimal. We recommend you disable it for better performance.
Press the Windows key and tap the R key simultaneously. In the Runbox type SERVICES. MSC to open Services.
In the Services app, find SysMain and right-click on it. Set the start-up type to disabled. Click “Apply”, “OK”, and restart your computer.
That’s it for now. There are other things you can do to speed up and optimize your computer, but we’ve covered most of those things – such as limiting startup programs – before.
The tips in this article will help you increase your computer’s performance and increase your privacy by limiting the data Microsoft receives from your computer.
Thanks for reading!
In the Run box I typed SERVICES. MSC and hit OK to open Services . Nothing happens. I’m using Windows 11. So I can’t do the final step you have here.
Linda