

How to Block Ads On Your Android Phone Using Private DNS
We’re going to step away from Windows tips and tutorials today to show you how to block ads on your Android smartphone. Since many of you have Android Smartphones, we hope you find this tip helpful.
“I am just a poor boy though my story’s seldom told… “ I have an Android Phone and I’ve been using Android smartphones for several years now, so I’m very familiar with them. And yes, I’m quite sure that iPhones have a similar setting, but since I don’t have (can’t afford) an iPhone or any Apple stuff, I can only provide this tip for Android users.
I’ve tested this ad-blocking method using Ablock’s free standard filter (dns.adguard.com). I was surprised how well it works. I was getting so frustrated with full-screen ads that wouldn’t close or ads that used a countdown timer before you could close them. I finally had enough, and my frustration led me to this solution.
So now, I’m going to show you how to use Android’s built-in Private DNS feature to block ads and trackers across most apps and web browsers on your phone. This method uses a free, reputable DNS service (like AdGuard DNS) that handles the filtering for you.
Best of all, this is an operating system setting and does not require installing any special app.
What is Private DNS?
Private DNS is a feature in modern Android versions (Android 9 Pie and newer) that routes all your network requests through a specific, secure server (a DNS server). By using a server that is pre-configured to block ad and tracking addresses, your phone prevents those ads from ever loading.
Here’s how to set up Ad-blocking via Android’s Private DNS feature
Step 1: Open Settings
Tap on the Settings app icon on your home screen or in your app drawer (it often looks like a gear).
Step 2: Navigate to Network/Connection Settings
Look for one of the following menu options, as the name varies slightly between phone manufacturers (Samsung, Google Pixel, etc.):
Connections (Samsung)
Network & internet (Google Pixel/Stock Android)
Wi-Fi & Network
Tap on the appropriate setting to proceed.
Step 3: Find the Private DNS Option
In the Network/Connection menu, look for a section called More connection settings, Advanced, or simply Private DNS.
Tap on Private DNS.
Step 4: Enter the Ad-Blocking Hostname
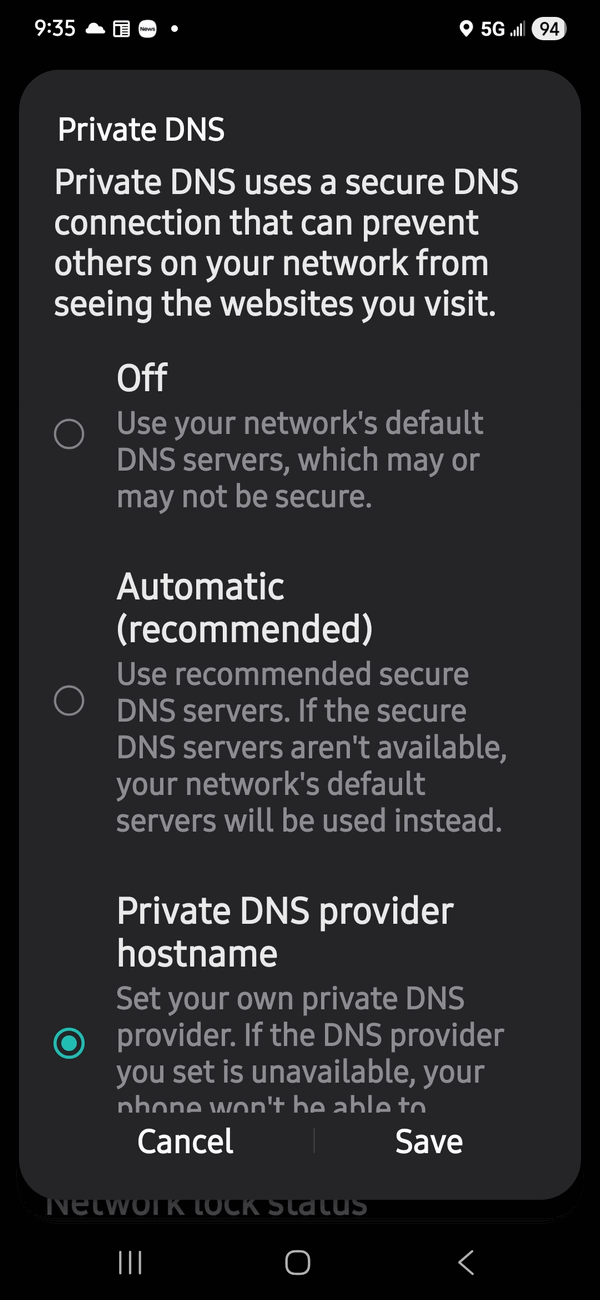
The Private DNS menu usually has three options: Off, Automatic, and Private DNS provider hostname.
Select the option: Private DNS provider hostname.
In the text box that appears, you will enter the address for the ad-blocking DNS server. For most users, we recommend using AdGuard’s standard filter.
Type the following address exactly:
dns.adguard.com
Tap Save (or the checkmark/OK button).
Troubleshooting & Verification
Wait a few moments: It may take a few seconds for the new setting to apply across your phone’s network connections.
Test it out: Open your web browser (like Chrome or Firefox) and visit a popular news website. You should notice that spaces where ads previously loaded are now empty.
What if it doesn’t work? If you have trouble connecting or if ads still appear, try using a slightly more restrictive ad-blocking address (which may block more content, but is sometimes more robust):
dns-family.adguard.com (This blocks ads and adult content).
Warning: If you have any other VPN or firewall apps running, they may conflict with this setting. You may need to disable the other app’s VPN function for Private DNS to work correctly.
To Turn Ad Blocking Off
If you ever want to disable this feature:
Go back to Settings > (Network/Connections) > Private DNS.
Change the setting from “Private DNS provider hostname” back to “Automatic” or “Off”.
Tap Save.
I don’t use the internet on my phone. I have it disabled. Can I still use this “Ad-blocking via Android’s Private DNS feature”? Or do I need it if I don’t use the web on my phone?
Thanks
Uwe A.
What else do you have that’s Android? I only tested this on my phonre.
I just have the android phone. I try to limit its use. Make a call or send a text.
Not sure how this reates to the article you’re commenting on.
I Just sent a reply. Not sure it went thru.
I only have the android phone. Nothing else that android.
What are you asking about your Android phone. These instructions for blocking ads work on any current verion of Android OS on any Android phone. What is your question?
Wow!!! What an excellent article and excellent advice (as usual). I set this up as instructed, then waited a few minutes. Next, I went to my Weather app, which usually displays 2 or 3 ads before showing the weather forecast. However, now there are no ads, and it immediately (with no delay) goes straight to the weather forecast. I then tried going through my Chrome Browser app, searching on Fox News and NBC News. Neither one showed any ads either. They each immediately went to the page with today’s headlines.
Thank you so much!
— Mike
whT CAN BEM DONE ON A IPHGONE TO BLOCK ADDS?
WHAT CAN BE DONEON AN IPONE TO BLOCK ADDS?
Sorry James, I’m not an iPhone user and I am not sure if iPhones have a private DNS setting. If they do you can us this tip. Check and see if you have a network setting for Private DNS, if so, you can use this tip – at your own peril though since I have no way of testing it as I was able to do with Android.
Works! Thanks!
wow. this is great tip. Tried it on my security camera app works great. adds gone no more waiting to see whose approaching my door. Thanks so much very helpful.
I have a Pixel 9a using android 16. When I type “dns.adguard.com” into Select Private Access Mode I get “the hostname you typed isn’t valid.” Am I supposed to use http://www.dns.ad…... ?
Hi Leslie, It’s not “Private Access Mode” it’s Private DNS. See the image below:
Is there something available like this for an android tablet?
Android on tablets is the same as Android on smartphones.
I did exactly as you said, but it then said I had no internet. I have a Samsung Galaxy…should I have waited longer?