

How to Turn Your Windows 11 PC into a Mobile Hotspot
Have you ever found yourself in a situation where your desktop or laptop has a great internet connection, but your smartphone, tablet, or a guest’s device can’t get online?
Windows 11 has a built-in feature that lets you transform your PC into a virtual wireless router. This allows any nearby device to connect to your PC and securely share its internet connection. Best of all, it works great whether your computer is connected to the internet via Wi-Fi or a wired Ethernet cable!
Why Turn Your PC into a Hotspot?
Before we jump into how to do it, here are several great reasons why this feature is incredibly useful for everyday tech setups:
Share a Wired Ethernet Connection
If your main desktop or laptop is plugged directly into a wall jack or modem via an Ethernet cable for maximum speed, it doesn’t have to stay isolated. You can turn that robust wired connection into a local wireless signal so your phone or tablet can enjoy those fast speeds, too.
Simplify Smart Home Device Setup
If you are setting up finicky smart home plugs, bulbs, or gadgets that require a dedicated $2.4\text{ GHz}$ network, you can use your PC’s hotspot as a temporary setup network to configure them without messing with your main home router settings.
Extend Your Wi-Fi Range
If your PC is located on the edge of your home router’s range but still gets a decent, stable signal, turning on the hotspot effectively turns your computer into a Wi-Fi range extender, pushing the wireless signal a bit further into a household dead zone.
Create a Secure, Temporary Guest Network
When friends or family visit and need internet access, you don’t have to hand out your master home Wi-Fi password. Instead, let them connect to your PC’s hotspot. When they leave, you simply toggle it off.
Setting Up Your Windows 11 Hotspot
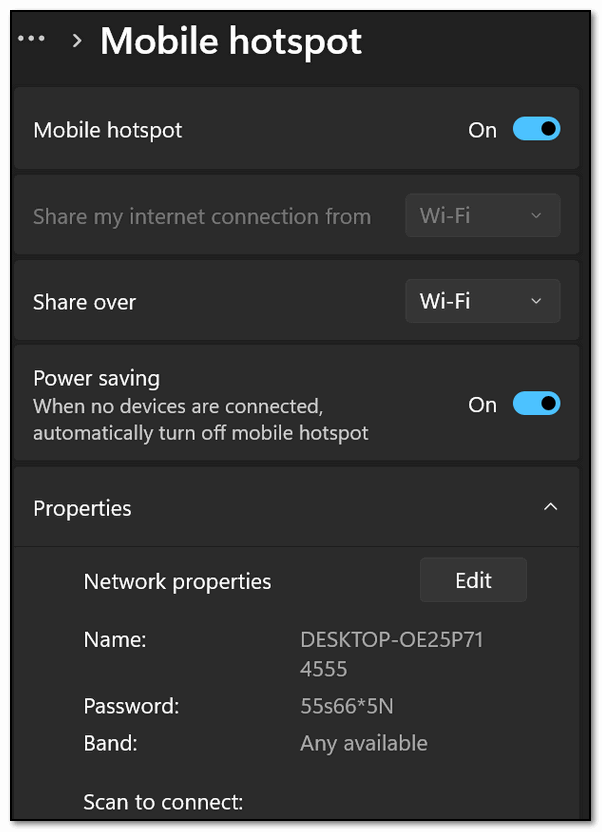
Setting this up is simple, completely free, and doesn’t require downloading any third-party software. And you don’t need to be a computer geek to do it. Just follow these simple steps:
Open Windows Settings
Press the Windows Key + I on your keyboard to open the Settings app.
Navigate to Network Settings
In the left-hand sidebar, click on Network & Internet.
Find the Hotspot Option
On the right side of the screen, scroll down until you see Mobile hotspot.
Click directly on the row (not just the toggle switch) to open its expanded menu.
Choose What to Share
Look for the dropdown menu labeled Share my internet connection from.
If you want to share your wired internet, select Ethernet.If you want to share your wireless internet, select Wi-Fi.
Set the Sharing Method
In the Share over dropdown menu, ensure Wi-Fi is selected.
Customize Your Network Name and Password
Click the Edit button at the bottom of the properties section.Type in a recognizable network name (e.g., Computer Hotspot).
Create a secure network password (it must be at least 8 characters long).
Click Save.
Go back to the top of the window and toggle the Mobile hotspot switch to On.
How to Connect Your Other Devices
Now that your PC is broadcasting, your other devices can find it just like any regular Wi-Fi network.
Grab your phone, tablet, or secondary computer and open its Wi-Fi settings. Look for the custom network name you created above (e.g., Computer Hotspot). Select it, type in the password you chose, and tap connect.
Your Windows 11 settings page will even show you a live list of exactly how many devices are currently connected to your PC, along with their names, making it incredibly easy to manage.
And also please remember this sage advice from both of us:
Turn off the hotspot when you’re done to save battery power if you’re using a laptop.
In the world of computer features, using built-in Windows tools is always safer than junking up your computer by downloading unnecessary third-party software!