

How to Reset Windows 10 and Keep All Your Files and Windows Apps
If you’re having major problems with Windows 10, you probably know you have two options to reinstall Windows by using Windows 10 Reset. All Windows 10 computers have at least the following reset options:
1. Reset Windows 10 and keep your personal files
2. Reset Windows 10 and remove everything
Option #1 is the best option since it reinstalls Windows but keeps your personal files and folders. BUT… you’ll still need to reinstall all your programs, regardless of which option you choose.
However, there is another option that Windows 10 users have – and that’s doing a repair installation. While it’s not exactly a reset, the results are similar. Doing a repair installation of Windows 10 allows you to reinstall Windows 10 and keep everything, including all your apps, programs, settings, and all your personal files. However, to do a repair installation of Windows 10, you must be able to boot your computer. The Windows 10 DVD and USB installation drive are bootable, but if you’re planning to do a repair installation, you cannot use them to boot into Windows.
Resetting your PC using the repair installation method.
Step #1: Create a Windows 10 USB or DVD
You’ll need an 8 GB USB Flash Drive (we suggest you use a brand new 8 GB USB drive for this) or a writable DVD.
Here’s what Microsoft says:
“…Before you download the tool make sure you have:
- An internet connection (internet service provider fees may apply).
- Sufficient data storage available on a computer, USB, or external drive for the download.
- A blank USB flash drive with at least 8 GB of space or blank DVD (and DVD burner) if you want to create media. We recommend using a blank USB or blank DVD because any content on it will be deleted.
- When burning a DVD from an ISO file, if you are told the disc image file is too large you will need to use Dual Layer (DL) DVD Media…”
Use the Windows 10 Download Tool to download the Windows 10 Media Creation Tool ( available from Microsoft here) to download and create a Windows 10 installation USB or to create an ISO file that you can use to create a Windows DVD.
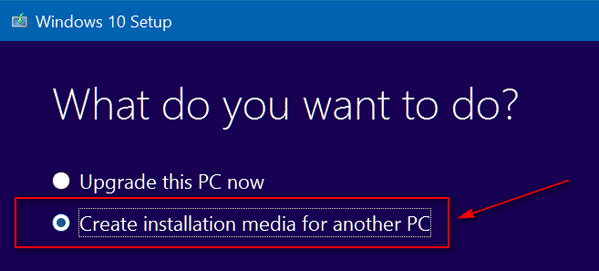
When you run the Media Creation Tool, choose “Create installation media for another PC”. Do not choose “Upgrade this PC now”.
A Windows 10 repair installation, also known as a Windows 10 in-place upgrade, can be used to reinstall Windows without deleting your files, folders, settings, or programs.
A repair install of Windows 10 is different from formatting your PC and doing a clean install of Windows 10. If you can boot your PC, and you want to do a Windows 10 reset, but you don’t want to re-install all your programs and apps, you should try a Windows 10 repair installation. A Windows 10 repair installation, like a Windows 10 reset, can fix a wide variety of Windows problems while keeping all your personal files and data, as well as all your installed programs and apps.
Step #2. Repair Installing Windows 10
Insert the USB drive or DVD into your PC. Browse the USB or DVD using File Explorer and find and double-click “setup.exe”.
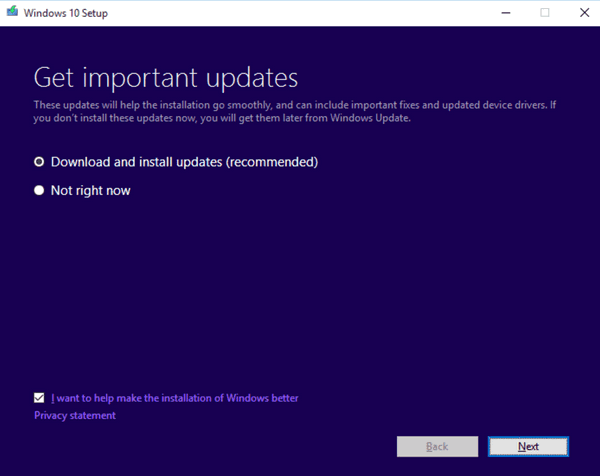
Windows 10 Setup will start with a “Get important updates” window. It’s a good idea to allow Windows to download any updates right away before you start the Windows 10 repair installation. If you don’t allow the updates now, you’ll have to do them later anyway.
You’ll see several prompts as Windows gets ready to reinstall. Watch and read each screen carefully and select any options you wish. However, when you get to the last dialog, be alert: It is the most important one.
This is the dialog that says, “Choose what to keep.” In this window, you must select the first option – “Keep personal files, apps, and Windows settings” – as shown in the screenshot below. If you don’t do this step, you will lose all your data and your programs. So, pay close attention to the “Choose what to keep” dialog.
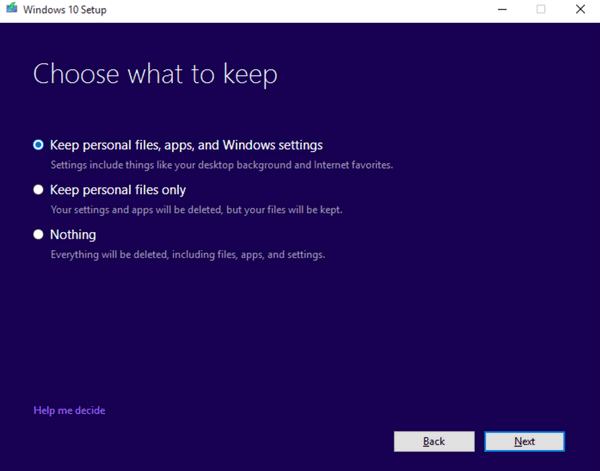
Above: To repair Windows 10 without losing any data or programs, you must select the first option: “Keep personal files, apps, and Windows settings”.
We repeat this because it’s so important.
We can’t emphasize enough how important the “Choose what to keep” dialog is in the Windows 10 repair installation process. You must select “Keep personal files, apps, and Windows settings”. Once you’ve done this, all you need to do is click on “Next” to begin the repair installation.
Your computer will automatically reboot several times as Windows saves your personal files, programs, data, settings, etc., and prepares to do the repair installation. When the process is complete, your files, folder structure, programs, settings, and data will all be safe.
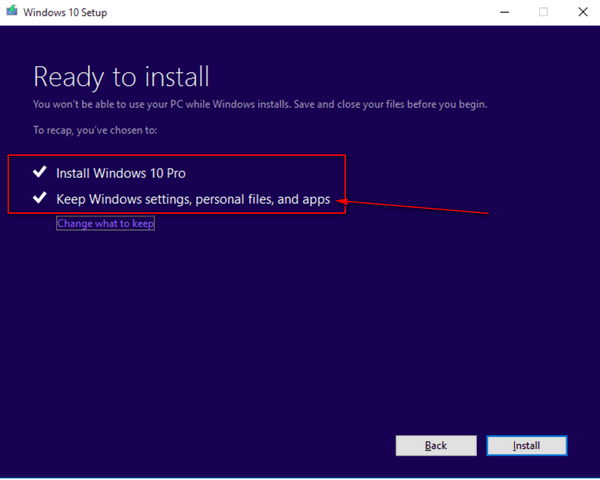
Above – ready to do the repair install. Note: This works with Windows 10 Pro or Windows 10 Home. You have to use the version that you currently have installed.
You don’t need no stinkin’ product key…
One final note. You won’t need a product key to do the repair install. You will never be asked for one.
Thank thank trust all went well
Exactly what I was looking for. But I’ve run into a problem, the option to save files cannot be selected. Any ideas to fix?
Ty for the guide.
I have never heard of this. Did you try shutting down your computer completely and leaving it powered off for five minutes and then restarting your PC and trying the reset again.
If you still can’t choose the option to “Keep my files” try running SFC & DISM. See our tutorial here. Don’t forget to restart your PC after running SFC and DISM.
In some cases Windows reset may not work. In that case, you might want to attempt a Windows 10 repair installation, as described on this page.
I ran those previously, no joy. But, just picked up a new disk and copied the partition I wanted to keep. Ty for the reply tho.
PS: This particular computer was one of the unlucky, “windows hates Nvidia” update fiasco from a year or two back and I hadn’t messed with it since then. Awesome guide, it was just in an odd situation. Thanks.
Thanks for posting, installing a new MB and it fixed some errors i had.