

How to Turn on Enhanced Protection in Google Chrome
The other day, I updated Google Chrome and noticed there was a new setting – or new to me anyway. It was an “Enhanced protection” section I hadn’t seen before. So, a few days ago I decided to try it out and see if it caused any performance problems or if it made Chrome slower. After almost a week of using “Enhanced protection,” I have not noticed any problems; everything seems as it was before I enabled “Enhanced protection”.
My thinking is that in this era of breaches and online theft, it’s good to add as many layers of protection as possible. So, if Chrome’s “Enhanced protection” does not negatively affect performance, why not use it. If you feel the same way, you can turn on “Advanced protection” this way.
Type Chrome://settings/security in Chrome’s Omnibar (address bar) and press Enter. You’ll see the following appear.
Tick the circle next to “Enhanced protection”. And that’s all there is to it.
Google explains “Advanced protection” this way:
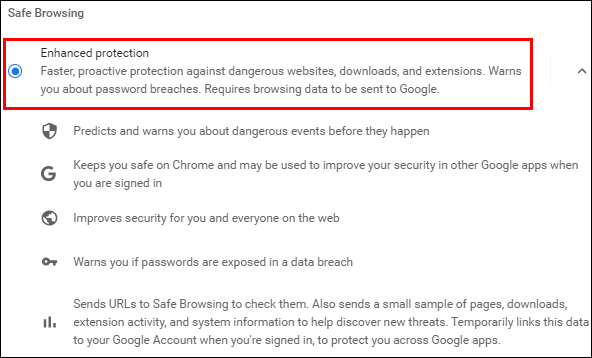
Enhanced protection
Faster, proactive protection against dangerous websites, downloads, and extensions. Warns you about password breaches. Requires browsing data to be sent to Google.
** Predicts and warns you about dangerous events before they happen.
** Keeps you safe on Chrome and may be used to improve your security in other Google apps when you are signed in.
** Improves security for you and everyone on the web.
** Warns you if passwords are exposed in a data breach.
** Sends URLs to Safe Browsing to check them. Also sends a small sample of pages, downloads, extension activity, and system information to help discover new threats. Temporarily links this data to your Google Account when you’re signed in, to protect you across Google apps.
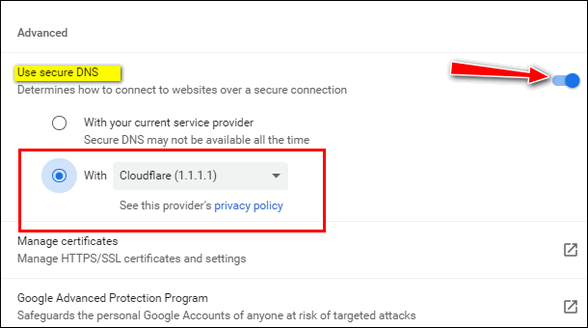
You can also choose a secure DNS provider. This determines whether Chrome will use your ISP’s DNS (which may not always be secure) or another secure DNS service provider.
Under the “Advanced” section of “Enhanced protection,” you’ll see the option to continue using your ISP’s DNS, or select a secure DNS provider from a list. For this example (and my testing) I chose “Cloudflare”.
First, you have to turn on Secure DNS using a switch. To turn on Secure DNS, slide the switch to the right. To choose another secure DNS provider other than your ISP tick the circle next to “With” and choose a provider from the dropdown list.
To learn more about secure DNS and secure DNS providers, see this post.

Our small business depends on donations from our readers and subscribers. All donations, regardless of size are welcome. Please help us so we can keep on helping you!