

The Correct Way to Move the Documents Folder in Windows 10 and Windows 11
And why you may want to…
If you’re running out of space on your Windows drive (usually C: ) changing the location of your Documents folder is an option if you have a second hard drive. One of the reasons for moving the Documents folder is that it frees up space on your C:\ (or Windows) drive, which is important if hard drive space is a concern. Another good reason is that it keeps your documents safe if something should happen to your C:\ drive. Once you move the location of your Documents folder, it will function exactly as it did before you moved it – but only if you move it correctly.
Here’s how to move your Documents folder correctly in Windows 10:
1. Right-click on the Start button.
2. Click on File Explorer. On the drive to which you want to move your documents, create a folder, name it Documents. Now close File Explorer and reopen it.
2. Right-click Documents (your current Documents folder not the new one you just created) and choose “Properties”
3. Now click the Location tab at the top.

Above: Documents “Location” dialog in Windows 10.
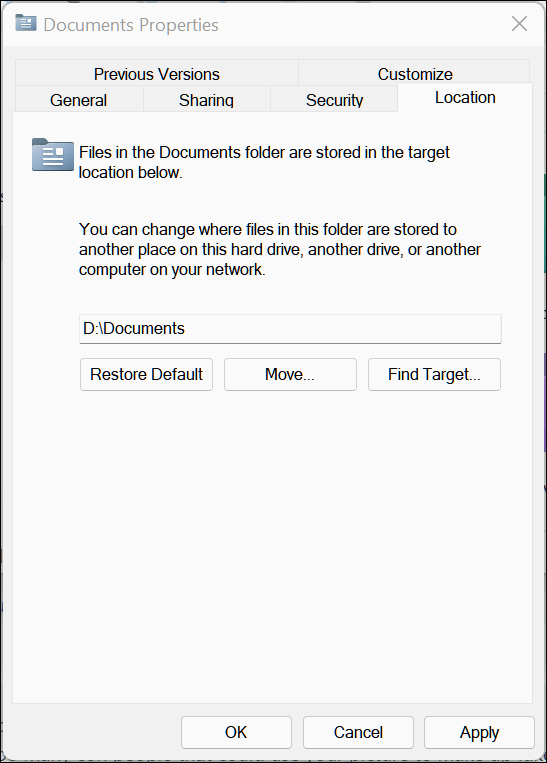
Above: The “Location” dialog in Windows 11 is the same as in Windows 10.
4. Next, click on Move. In the Destination dialog, select the new location for your Documents folder (the folder you created in Step #2. The new location should appear in the text box – if it does not you can click “Find target” and navigate to it.
5. Click on OK. Windows will prompt you to confirm. Click Yes and you’re done. Note: It may take a while for the process to complete – while all files in the Documents folder are moved to the new location. The time it will take to transfer your Documents folder depends on how many files and folders are in your Documents folder.
When you’ve completed this, you won’t notice any difference — the Documents folder in the new location will show up and work in Windows as if it had never been moved. When you save files to it, they will be saved in Documents as they always have been, the only difference is that the Documents folder is not on your C drive – but on the drive you chose above.
Despite its location, the Documents folder will function the same. And the best part is, if your C: drive is getting full, Documents won’t be taking up a substantial amount of space on that drive. Plus, if anything happens and you can’t boot to Windows or the C drive fails, the Documents folder — and all the files and folders in it –will be safe on another drive.
And finally, if you decide you want to move your Documents folder back to its original location, it’s easy to do. Just open the “Properties” dialog of the Documents folder, click the “Location” tab, and click “Restore default”.
In Windows 10 and Windows 11, you can change the location of your Music, Pictures, Videos, folders too. You can do it the same way as you move the Documents folder.
Your InfoAve Daily arrived with perfect timing.
I needed more space on my PC and had no idea how to achieve it.
Your clear instructions allowed me to move my Documents Folder and free up space.
There are never enough ‘Thank yous’ for you dear Darcy and TC.
Cheers from Down-under … Pam/PamelaD