

Windows 10 Recycle Bin Options
In Windows 10, by default, when you delete a file you don’t get a warning that asks if your sure you want to send the file to the Recycle Bin. You just right-click the file and click Delete and it’s gone. Unless you’ve otherwise configured Recycle Bin the file does go to the Recycle Bin and can be immediately returned to its original location by pressing CTRL + Z immediately after deleting it.
But if you want to be warned before you delete a file, like you use to be warned in Windows 7 and earlier versions of Windows, that can be easily done. And here’s how you do it.
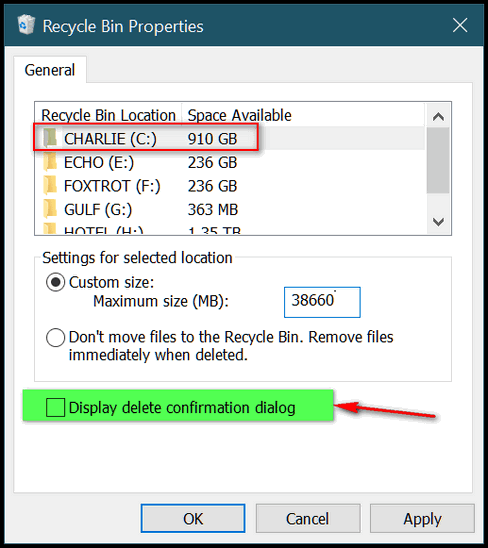
1. Right-click on the Recycle Bin icon on your desktop and click on Properties.
2. Choose your C:\ drive.
3. Tick the box next to “Display delete confirmation dialog”
4. Click Apply/OK.
Now we don’t recommend this because the Recycle Bin is like a safety net when you delete files. But if your brave and don’t even want the files to be moved to the Recycle Bin, you can tick the circle next to “Don’t move files to the Recycle Bin. Remove files immediately when deleted. Keep in mind if you do this there will be no easy way to recover the deleted files.
Oh and Colombo (EB) reminded me to say — “just one more thing”: If you’re going to be using a cleanup utility to clean up your PC, most of them will empty your Recycle Bin automatically, so be sure to check to make sure you don’t have anything you need in the Recycle Bin before doing a system cleanup.
And did you know that the shortcut CTRL+Y in most Windows applications functions as Redo, reversing a previous Undo, Now you do. Right?

Thanks to your fantastic response to our Cloudeight Backup Intro Offer – we are extending our special introductory pricing through Monday Feb 5, 2018!
THANK YOU so much for your response to our new Cloudeight Backup Service. We have installed this backup system on dozens of computers now and the results are amazing. Customers have been extremely pleased with how easy the backup system is to monitor and use because once it’s set up, there is no other action needed. Reliable backups that don’t require any user action. Plus with the rescue system, even with a hard drive failure – you can restore you data to a new hard drive and not lose anything. Read TC’s review here.
Here is just a one of the many testimonials we’ve received for our backup service & the Ashampoo Backup Pro 11 backup program & setup:
“Finally! A backup program you can almost forget about. Thanks TC for installing the Ashampoo Backup Pro 11. Everything is working OK and hopefully I never need to use it. You did an excellent job. Highly recommend this service. Thank again! Jerry V.”
Our new Cloudeight Backup Service includes:
- Installation of Ashampoo Backup Pro 11 by Cloudeight Direct
- Set up and configuration of Ashampoo Backup 11 for bulletproof reliability and best performance
- A lifetime license for Ashampoo Backup Pro 11
- Creation of USB, CD/DVD recovery media so you can access your backup even if your computer won’t boot
- All for just $30!
Get more information and/or get your backup service key here.
I just want to thank TC again for the fast & reliable job in backing up my computer. The people that are not subscribing to cloudeight are missing out on a lot of good tips,tricks & how-to’s. They have been able to do so much with my computer & been able to fix so many things that I can’t begin to remember it all. TC or Darcy are the ones to go to when you have a computer problem that you don’t know how to fix yourself. I just do not trust anyone else . TC did a fantastic job & is very friendly.
I don’t keep my computer plugged in as I don’t have a convenient place to do that..I am .thinking I need to have it plugged in when i’m not using it or it won’t be able to do the incremental backups. Am I thinking right? Thanks again for all two of you do for us.
Hi Arlene thanks so much for your support and your kind words. Your backups are set to weekly, I believe on Fridays at 1PM. You can check the day & time this way. Open the program, click on Actions > Change Plan > then keep clicking next until you get to the schedule. You can see on the Schedule what day and time your backup is scheduled. Then just click the back buttons till you get back to the main program interface close the program Window. Keep in mind that I’ve set yours to a time when you’re likely to be using your computer. I can do this with the backup we installed because of it’s automatic pausing feature. It will automatically pause if you are using your computer heavily so it will not cause any slowdown with your system. I am pretty sure yours is set to Fridays at 1 or 2 PM 🙂