

How to Change Your DNS Settings
And why you might want to
Today, we’re going to show you how to change your DNS settings in Windows 10 and Windows 11 and tell you why you may want to.
But first, let’s discuss what DNS servers are. Don’t worry – we’re not going to get all technical on you. We will define DNS servers as simply as possible. However, you don’t need to know what a DNS server is to use this tip, but you should have a basic understanding of DNS and what DNS servers do.
So, here’s a simple definition of DNS and DNS servers from Lifewire’s “What is a DNS Server”:
The Domain Name System (DNS) is a technology standard for managing names of public Web sites and other Internet domains. DNS technology allows you to type names into your Web browser like lifewire.com and your computer to automatically find that address on the Internet. A key element of the DNS is a worldwide collection of DNS servers.
A DNS server is any computer registered to join the Domain Name System.
A DNS server runs special-purpose networking software, features a public IP address, and contains a database of network names and addresses for other Internet hosts.
DNS Root Servers
DNS servers communicate with each other using private network protocols. All DNS servers are organized in a hierarchy. At the top level of the hierarchy, so-called root servers store a complete database of Internet domain names and their corresponding IP addresses…
In other words, when you type in https://www.microsoft.com/ you’re typing a numerical address like 207.46.129.3 which is resolved by the DNS server to the name you know and love… www.microsoft.com. Due to security issues, many sites will block attempts to directly reach the site by typing in its numerical address…but whoa! We’re getting in way too deep.
Without DNS servers you’re not going to get anywhere on the Internet. And if you have not changed your DNS settings, the first DNS server you’ll use to get to the Internet and the Web sites you want to visit is your Internet Service Provider’s DNS server(s). However, you’re not stuck using your ISP’s DNS servers. You have options. The option we’re going to show you today is to use Google’s public DNS servers, which will let circumvent your ISP’s DNS servers.
Lately, we have had several people who were unable to access certain sites at certain times. Sites would randomly be available. In at least two cases, while working with customers using our Cloudeight Direct Computer Care service, we found that customers could not access Facebook. And one of them could not access Facebook, Twitter, and other sites she liked. In all these cases, instead of the websites loading, they got a DNS error.
You’re probably using your ISP’s DNS servers. But you don’t have to. Instead, you can use DNS servers run by third parties. Three of the most popular third-party DNS servers are Google Public DNS. Cloudflare’s Public DNS and OpenDNS. We’re going to show you how to change your DNS settings from your ISP’s default settings to Google Public DNS on Windows 10 and Cloudflare’s DNS on Windows 11. All three will work on Windows 10 and Windows 11.
Using Google’s Public DNS may make your connection a little faster and a bit more secure
If your ISP is not updating its DNS settings and/or is lax about its DNS security, using an alternate public DNS service like Google’s (or one of the others) can help increase the speed and security of your connection. And using a third-party DNS service can help block phishing and other counterfeit sites.
As far as speeding up your connection we must tell you this. Please don’t think by changing your DNS settings you’re going to significantly improve the speed of a slow Internet connection and make it fast – it’s not going to happen.
You can use Google’s Public DNS servers in Windows 10 and Windows 11. In this example, we’re going to show you how to use them in Windows 10. And later we’ll do Windows 11 using Cloudflare’s DNS servers. But you can use Google, Cloudflare, or OpenDNS in Windows 10 or Windows 11, it’s your choice.
Changing your DNS Settings in Windows 10
So, let’s change our Internet adapter settings to use Google’s Public DNS:
1.) Open Control Panel – type Control in taskbar search and press Enter when you see Control Panel appear in the search results.
2.) In Control Panel, click on “Network & Sharing Center”.
3.) In Network & Sharing Center click on “Change adapter settings” (it’s on the left side).
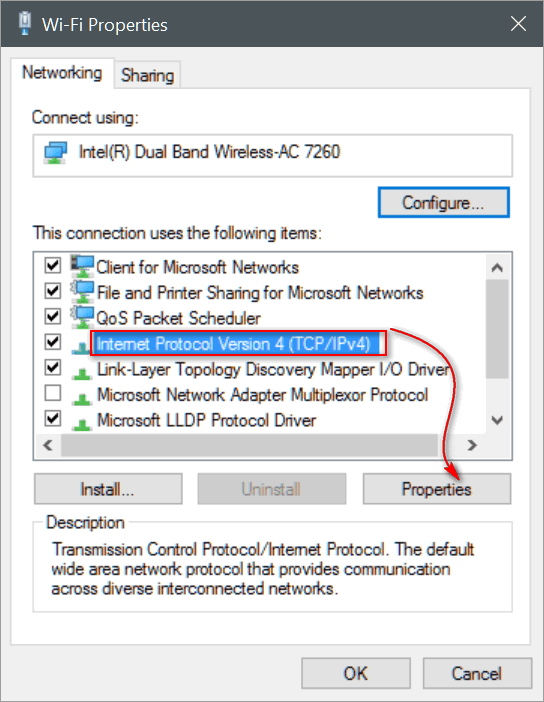
4.) Right-click on your active Wi-Fi or Ethernet Adapter and click on “Properties”. (If you use both Ethernet and Wi-Fi, you’ll have to change both adapters, one at a time).

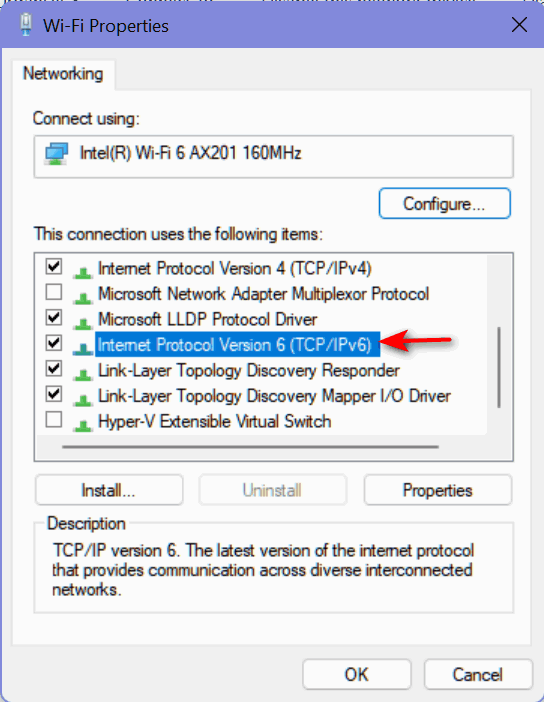
In the Properties dialog find “Internet Protocol Version 4 (TCP/IPv4), click it to highlight it, then click “Properties”:
In the TCP/IPv4 properties dialog, tick the circle next to “Use the following DNS server addresses” and enter 8 8 8 8 next to the preferred DNS server and 8 8 4 4 next to “Alternate DNS server”. Please note that you’ll have to press the space bar after entering each number. Press OK when you’re done.

After you press OK, you’ll be back in the Adapter Properties dialog. This time you’ll need to click on “Internet Protocol 6 (TCP/IPv6)” to highlight it, then click “Properties”.

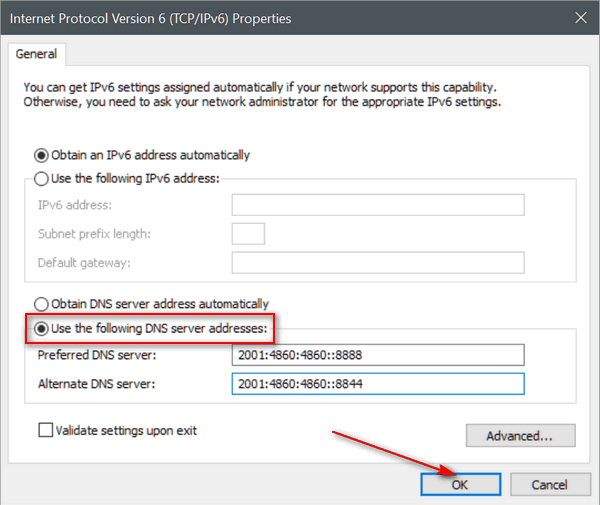
In the TCP/IPv6 Properties dialog, tick the circle next to “Use the following DNS server addresses” and …
Next to “Preferred DNS server” enter the following (you can copy & paste if you like):
2001:4860:4860::8888
Next to “Alternate DNS server” enter the following (copy & paste if you like):
2001:4860:4860::8844
Keep in mind those numbers must be exactly as shown. So, double-check before you click OK.
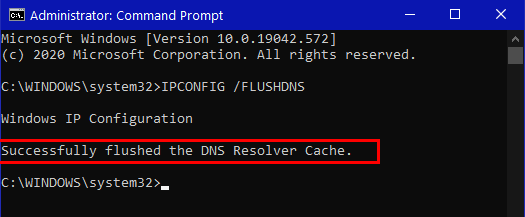
Now you’re almost done. Open a command prompt (does not have to be an administrator command prompt) and type…
IPCONFIG /FLUSHDNS
and then press Enter. If you typed the command correctly, you’ll see the confirmation below: “Successfully flushed the DNS Resolver Cache”. If you don’t see that confirmation, then you typed the command incorrectly. Make sure you leave a space after IPCONFIG and before the slash.
And that’s it. If you ever want to change back to your ISP’s DNS servers, just got back to the IPv4 and IPv6 properties and tick the circle next to “Obtain DNS server address automatically.
You’ll need to run the IPCONFIG /FLUSHDNS command again.
Changing DNS Servers in Windows 11
Changing DNS servers in Windows 11 is almost the same as changing DNS servers in Windows 10. For our Windows 11 example, we’re going to use Cloudflare’s public DNS servers.
1.) Open Control Panel (Type Control into Start menu search or taskbar search & press Enter).
2.) In Control Panel, click on “Network & Sharing Center”.
3.) In Network & Sharing Center click on “Change adapter settings” (it’s on the left side).
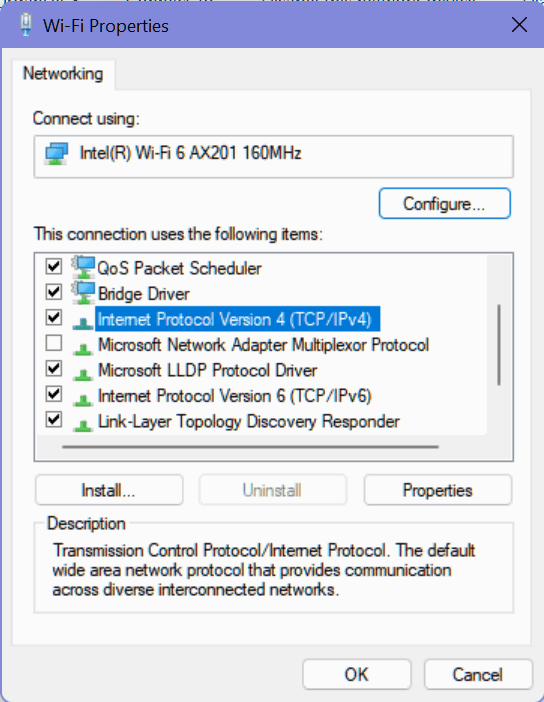
4.) Right-click on your active Wi-Fi or Ethernet Adapter and click on “Properties”. (If you use both Ethernet and Wi-Fi, you’ll have to change both adapters, one at a time).

Double-click on Internet Protocol Version 4 (TCP/IPv4).
In the TCP/IPv4 properties dialog, tick the circle next to “Use the following DNS server addresses” and enter 1 1 1 1 next to the preferred DNS server and 1 0 0 1 next to “Alternate DNS server”. Please note that you’ll have to press the space bar after entering each number. Press OK when you’re done.

After you press OK, you’ll be back in the Adapter Properties dialog. This time you’ll need to click on “Internet Protocol 6 (TCP/IPv6)” to highlight it, then click “Properties”.
In the TCP/IPv6 properties dialog, tick the circle next to “Use the following DNS server addresses” and enter 2606:4700:4700::1111 next to the preferred DNS server and 2606:4700:4700::1001 next to “Alternate DNS server”. Hint: You can copy and paste these into the dialog.

Press OK to save the changes.
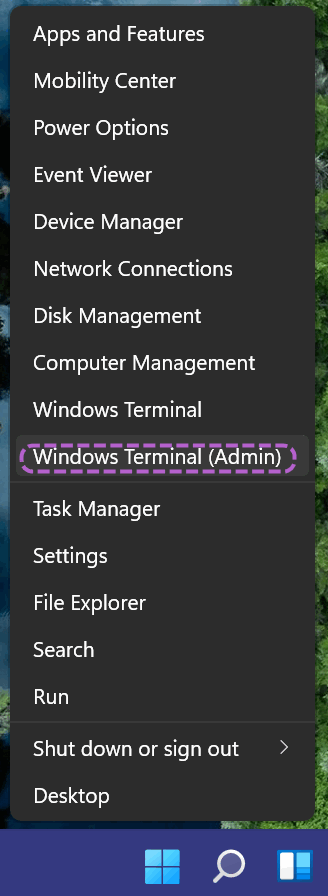
In Windows 11 you can use the Windows Terminal (Admin) to flush the DNS resolver cache. Right-click on the Start button and choose Windows Terminal (Admin).
In Windows Terminal (PowerShell) at the prompt type the following:
IPCONFIG /FLUSHDNS
And press Enter. You’ll see “Successfully flushed the DNS resolver cache.” appear in the dialog. Close Windows Terminal. And you’re done.

Now you know how to change your DNS settings in Windows 10 and Windows 11 – using Google’s Open DNS servers and Cloudflare’s DNS servers. OpenDNS also offers public DNS servers. You can learn how to use those here.
If we change the DNS server now while still using Windows 10, will need need to go through the same procedure when we upgrade to Windows 11?
If you upgrade to Windows 11 from Widnows 10 it does not change your DNS settings.
I am in a household with 1 router & 6 computers. Will changing the DNS server on my PC affect the others?
No, it only changes the settings on your computer.