

Jump Lists are a feature in Windows 7 that shows you recently accessed files for a particular application or recent tasks related to an application.
Most commonly, Jump Lists are accessed by right clicking an application icon in Windows 7 taskbar. But Jump Lists can also be accessed by left clicking an application icon and while holding the mouse click dragging the icon upwards. For example — just right-click and drag the application icon upwards to access Jump Lists in Windows 7 using the left mouse button. The more you drag icon upwards the less transparent the Jump List becomes.
So why in the world would you need or like Jump Lists? Well, we use them a lot when we’re doing research for this newsletter (don’t laugh!). And I use them to add Web sites I want to go back and look at later but don’t want to add to my bookmarks or favorites. Or if you access a files or files often with a particular program – say MS Word for example – Jump Lists can make it easy for you to access those files again when without browsing to them. But in order to make your favorite items always accessible from a program’s Jump List, you need to pin it to the top of the Jump List. And that’s as easy to do as left-clicking on one of the recent items that is displayed in the Jump List and dragging it to the very top of the list. Once a file is pinned to the top of the Jump List, it will stay there until you unpin it. I find Jump Lists handy for a lot of things, particularly when working frequently with the same file and when adding sites I want to check again – but which I don’t really want to add to my favorites or bookmarks.
Here’s a Jump List for Internet Explorer 9. Since I rarely use IE9 the Jump List is short. But you can add as many items as you want to your Jump Lists – we’ll show you how to increase or decrease the number of items in a minute.
<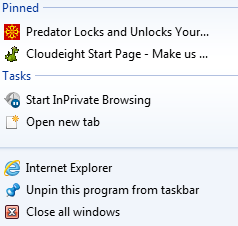
The top two items (above) are pinned to Internet Explorer 9’s Jump List. The top one is a site I was looking at and wanted to go back to test a program. The second is my favorite Web page 🙂 To access either of those two, all I have to do is click on them.
You can change the maximum number of items you can pin to a program’s jump list too – and it’s easy to do. Right-click your start button, choose “Properties”, click the Start Menu tab, then click the “Customize” button.
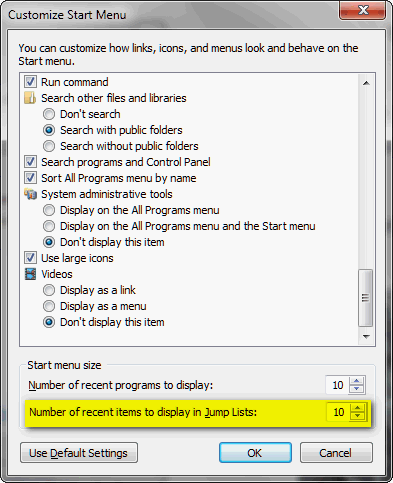
You can show as many as 60 items in your Jump Lists but don’t get crazy :-). I think 15 or so is enough – but hey! it’s your computer. Use the up and down arrows to the right of the “Number of recent items to display in Jump Lists: ” to set the number of items – then click “OK” and then “Apply” on the dialog that appears after you click OK. Windows sure wants to make certain you want to do what you’re doing.
Oh, and one more thing – not all programs support Jump Lists.