

How to Make Your Own Screensaver on Windows 10
This tip was inspired by a question I was asked during a support session.
Until yesterday I hadn’t given any thought to making screensavers on Windows 10 using pictures already on my computer. And I sure didn’t realize how easy it was to do. If you’d like to make a custom screensaver using your personal photos, or any photos on your computer, follow me., and I’ll show you how.
Step #1. This is a step you won’t appreciate now, but you will later. By default, Windows 10 will use whatever photos you have in your Pictures folder. But it won’t use the pictures in any subfolders in your Pictures folder. But you can choose any folder you want, so here’s what I recommend that you do first.
Make a folder in your Pictures folder called “MyScreenSaver” or whatever tickles your fancy – as long as you know what it is. Then copy all of the photos you want to appear in your screensaver to that folder. Our “Copy to / Move to” tip works great for this. Once you copy all the pictures you want in your screensaver to the folder you created, move on to…
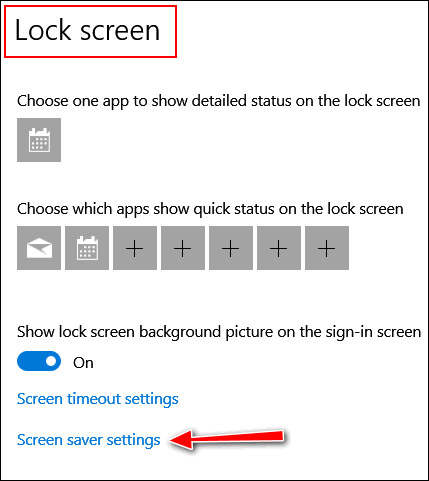
Step #2. Now with all the photos copied to the folder you created for your screensaver, right-click on an empty area of your desktop and choose “Personalize”. In “Personalization” click on “Lock screen” (it’s in the menu on the left). Scroll down until you see “Screen saver settings”.
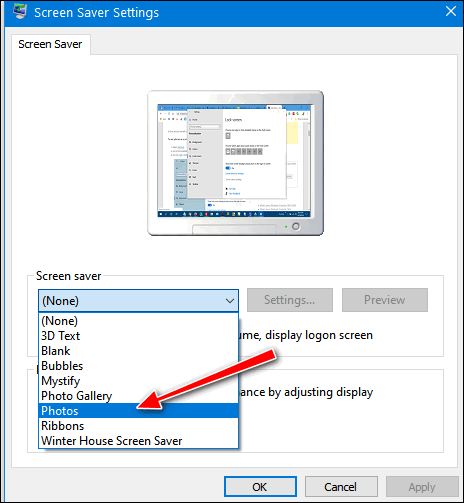
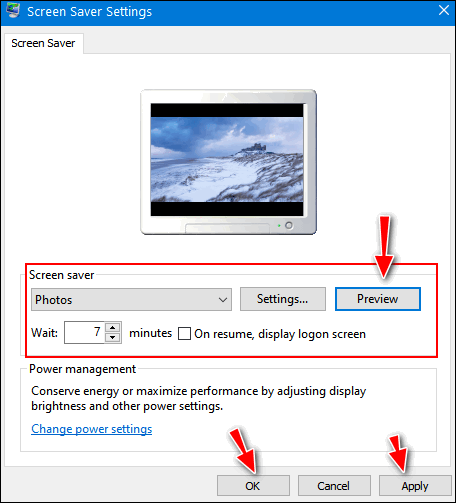
Step #3. When Screen saver settings opens, use the down-arrow to display ad drop-down menu. Choose “Photos” from the list.
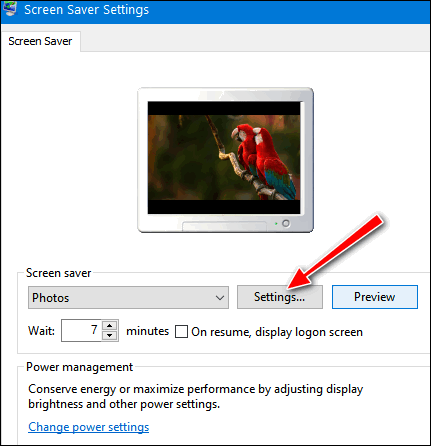
When you choose “Photos” you’ll see this dialog:
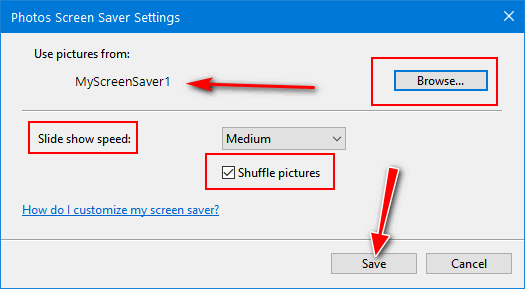
Your “Pictures” folder will be the default folder. Click”Browse” and browse to the folder that contains the pictures you want to use for your screensaver.
I created a folder called MyScreenSaver1. After you select the folder you want to use, you can choose how quickly you want the images change in your screensaver to change… slow, medium, or fast. And if you check the box next to “Shuffle pictures”, Windows will display your pictures in random order.
Once you have every set, click “Save”.
Step #4. It’s time to preview your screensaver and make sure it looks the way you want it. If the pictures are changing too rapidly or too slowly for you, just click “Settings” and go back and change the speed.
Once everything is the way you want it, click “Apply” and “OK”.
Now you know how to make a screensaver with your own photos or any photos you have on your computer.

Now when you shop Amazon using our links, you can save money, get great products and help us too! For every purchase you make using our Amazon affiliate links, we make a small commission. If you shop at Amazon, we hope you’ll use our Amazon affiliate links. It won’t cost you a penny more, but it will help us a great deal! Al l you need to help us is use the following link whenever you shop Amazon – for anything.
That link goes to the same Amazon site you’d see if you went to www.amazon.com, but when you use our link, we’ll get a small commission on anything you buy from Amazon. It’s another way you can help us and it won’t cost you a penny more. And you’ll get the same great Amazon prices, sale prices, and promo prices you always get.
So the next time you shop Amazon, use our special affiliate link and bookmark the Amazon page once you get there. Then use that bookmark whenever you shop Amazon!
Thanks so much for helping us!
Hi TC & EB,
Easy to follow instructions, excellent explanation.
I created a desktop picture change using a selection from my 300+ pictures folder on a DVD and USB, x 2 backup folders.
“Why is it that the ScreenSaver ceation program only allows a few pictures” asked my friend and neighbour.
A Julius Sumner Miller question, “Why Is It So.”…… I have difficulty n answering the question.
Over to you friends, TC & EB.
I am not a screensaver type of guy – nor a desktop slide show type… I just learned how to make a Windows 10 Screensaver out of personal photos so I could help anyone who would like a screensaver of their photos. So, Microsoft offers the answer not only to the limit for the number of pictures in homemade screensaver but also the limit for the desktop slideshow. You can see what they have to say here. Twenty is fine for me 🙂
I have my own photos as my screen saver but since an MS upgrade they have become distorted as if stretched across the screen. Photos of people make them fat. I feel that there must be a simple adj.ustment but I cannot find it
Hi Brian,
The images you use to create the screensaver are not resized the way the desktop backgrounds are. If you set a desktop background you can go to Settings > Personalization > Background and choose the background image then choose ‘Fill’, ,”Stretch”, “Tile”, “Center”, “Span”. But the screensaver tool does not offer these options. The screensaver uses the images in the folder you chose when you created the screensaver. If it was working and it is not know, then I ‘d suggest you recreate the screensaver and give it a different name, then, if it works, set the new one as your screensaver.