

Windows 7 has all you need to make an image-based (clone) backup – except of course the external hard drive you’ll need to store the backup. If you have two internal hard drives you can skip buying an external hard drive. However, ALWAYS store your backup on the drive which does not include Windows. You should never, ever, ever, ever, ever store any backups on the same drive on which Windows is installed. If you do, you’ll be sorry if Windows goes belly up – or your hard drive goes bad and you need to use your drive image to restore your computer. No way, it ain’t going to happen if you stored your image-based backups on the same drive with Windows.
And here’s another tip. It might look very convenient to store your backups on DVDs since Windows 7’s backup feature offers that option. But this is 2011, not 1999. Computer hard drives are huge – generally between 300 – 700GB. A DVD holds a tad over 4GB. If you have a 500GB hard drive and it’s half full, you’re going to need about 32 DVDs to do the backup even if he drive image is compressed to about 50% of the size of the data being backed up. It might cost you more to buy the DVDs than to buy an external hard drive – and even if it didn’t, do you want to sit by your computer for hours feeding it DVDs? No you don’t.
So we are basing this tip on you saving your backup to an external hard drive. Image backups – or drive image backups – are never small – even if the program you use to create them uses compression. Plan on at least gettin at least a 500GB external hard drive on which to store your backup.
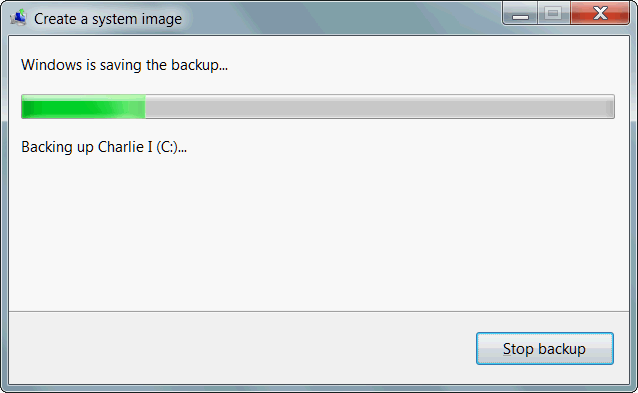
We don’t want to lead you astray. Windows 7’s backup is good but it does not have all the options and features or bells and whistles of many of the free or commercial image-based backup programs that are available. But that can be a positive thing too since fewer features means it’s simpler to use. Windows 7’s backup feature does make drive images in about the same amount of time as some of the other backup programs we’ve tried. In other words, it takes a while. The more data you have, the longer it will take to back up. I continued to use my computer doing the backup, you may choose to do so as well. It took a little less than two hours to complete the backup of my laptop – about 300GB of data.
And while Windows 7’s backup doesn’t call their backup an “incremental backup” – it does essentially that. Once you’ve made your initial “system image” backup, you can schedule it to run once a day, once a week, once a month – whatever interval you prefer, and Windows will only add or modify things which have changed from the first backup you made with it. That’s because Windows 7 backup is a block-based file backup.
This means each block in a file is examined and if a duplicate already exists on the last backup, and this is the important thing, even if from a different file, that block is not saved. Which is really good and very clever. So the first backup you make is always a full backup. The following backups will only save changed blocks. The one disadvantage to this method is that you cannot manage your backups individually. But for most of us, it will work just fine. The most important thing is that you have an image-based backup. It’s the only kind of backup that will completely restore your computer to exactly as it was before disaster struck, even if the disaster was a bad hard drive. You can use your image-based backup on a brand new hard drive – IF the new drive is the same size or bigger than the old hard drive.
Here’s how to create a drive image (clone) or as Windows 7 calls it – a system image – in Windows 7.
First insert a blank writable CD or DVD in your computer’s DVD/CD drive. You’re going to need to create a Windows 7 rescue disk first so that, in case you can’t get into Windows to access your backups, you can boot with the rescue CD/DVD which contains all the tools you need to fix your system and/or recover it using your “System Image” (another name for drive image or clone).
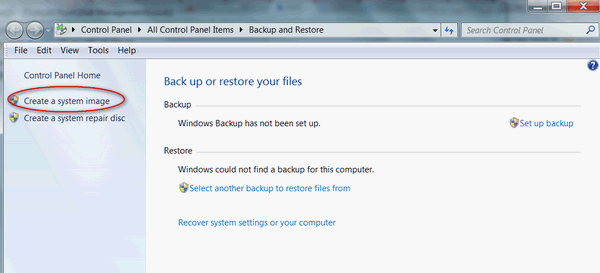
1. Click Start, Control Panel, System and Security – and click “Back up your computer”.
2. On the left side of the dialog, you’ll see “Create a system repair disc” click it. Don’t skip this step!
3. You’ll see a dialog that says: “A system disc can be used to boot your computer. It also contains Windows system recovery tools that can help you recover Windows from a serious error or restore your computer from a system image.” You’ll also see your DVD/CD drive and an arrow to let you choose the DVD/CDRW drive you want to use, if you have more than one. Choose the drive you want to use and click “Create Disc.”
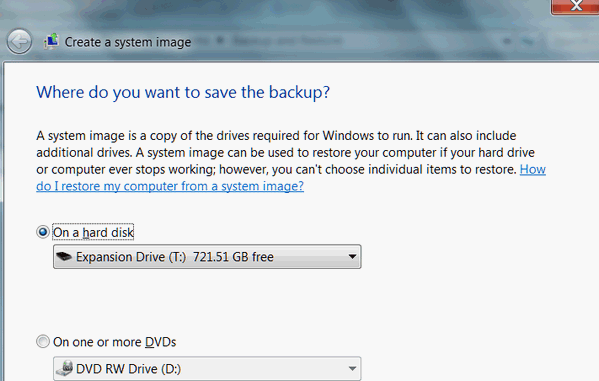
4. After you’ve created the disc, go back to the previous dialog and choose “Create a system image”. Make sure your external media is plugged in and ready – or if you have a second internal hard drive, make sure there is enough space available on it to complete the backup – if there is not, Windows will warn you.
5. Follow the Windows Backup wizard to create your system image ( drive image or clone). You’ll have the option of selecting a second internal hard drive, a hard drive partition other than the Windows partition, or an external hard drive or DVDRW drive where you can, if you wish, use multiple DVDs to store your backup – but we don’t recommend DVDs for storing backups – as you could end up having to use 30 or 40 of them for each backup – it’s neither practical nor cheap. And we don’t recommend a partition on the Windows drive either. If that hard drive goes bad, you’ll lose your backup.
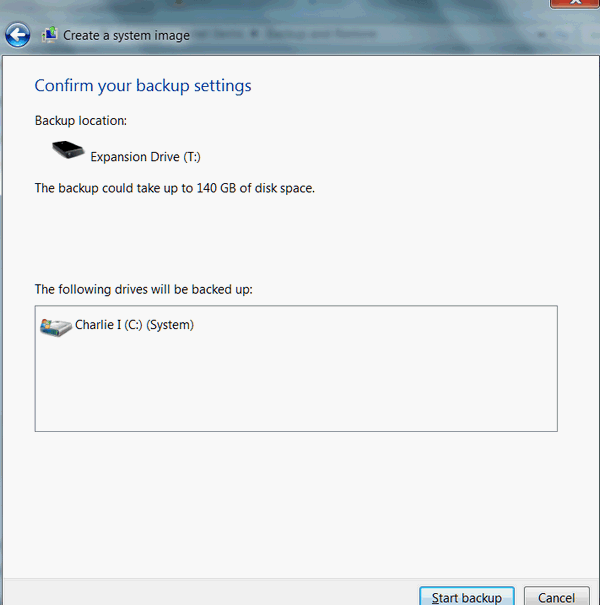
Above: There is approximately 300GB of data on my hard drive – Windows 7’s backup compressed it to 140GB or about half its original size.
That’s all there is to it. You’ll be able to back up your computer – including the operating system – and if anything really terrible happens to your computer – you’ll be able to restore you entire system in about 45-60 minutes.
Remember too, you can use your system image to recover your computer even if your hard drive completely fails. All you need to do is install a new hard drive which has a capacity equal to or greater than the capacity of the hard drive that failed.
This tip will work in all versions of Windows 7 (32 and 64bit) except the Starter edition.
Great article and easy to follow instructions, thank you.
I have a question: Can you make backup system images
each time you want to back your system up without
Windows replacing the very first one made? Oh, and of
course they will be made on an external hard drive.
I do my backups and images manually instead of using an automatic backup schedule and I believe there may be a glitch in the settings dialog box – Backup and Restore>Manage Space>System Image>Change Settings. It happened to me and I’ve read articles from others who experienced the same thing.
The claim is that you can set Windows to save images up to 30% of the available backup space. There is also a claim that you can select an option to retain older images, or just the most recent image.
However, the only options I see are to retain the most recent image and delete older ones, or to delete all images.
The only workaround I’ve found to keep older images is to rename the folder that Windows will be looking for.
Backups are saved in this format: backup location\WindowsImageBackup\computer name\Backup year-month-date-time. Example: J\WindowsImageBackup\Jane-PC\Backup 2010-12-12 040318.
You have to “trick” Windows by renaming Jane-PC to Jane-PC-date (or copy that folder to a different location).
Then when Windows goes looking for where the backup is stored, it thinks that there is no system image there at all – so it will create a new one.
When you need to restore your computer to a previous image,you’d rename that folder back to what Windows is looking for (Jane-PC) and that should work.
I apologize if I’ve left out any specific information, but there are several forums out there where this issue is discussed at length.
If anyone has an answer to this quirk, please let me know. BTW – multiple images are not saved if you use a networked drive.
Thank you.
Thanks for the tip & insight Marty. On my
external HD i had just one image back up; and i
renamed it and just did another image back up
and Microsoft created a new one and did not
bother the other one i renamed!
Thanks to your tip by renaming it! Moreover,
personally i have found that creating an image
is much faster and too, you get it [all] by
doing it this way. Thanks again Marty for
taking your time in sharing this wonderful tip.
Cloudeight said:
“This means each block in a file is examined and if a duplicate already exists on the last backup, and this is the important thing, even if from a different file, that block is not saved. Which is really good and very clever. So the first backup you make is always a full backup. The following backups will only save changed blocks. The one disadvantage to this method is that you cannot manage your backups individually”.
Ron Lewis asks:
“Can you make backup system images each time you want to back your system up without Windows replacing the very first one made? Oh, and of course they will be made on an external hard drive.
I believe you could make separate individual system image backups, but that would really be a waste of disc space!
This is an incremental backup, which means that once you have made the initial disc image backup all further backups only add or save new or altered data (incremental) which means the original backup remains as it was saved, but adding new or altered data at the time of each successive backup. Most backup programs set a date and time point at each backup interval which means you can choose to restore your system from any one of the date/time points. This is a good option if you run into trouble with something bugging your computer, you can then restore your computer back to a date when your computer was running well, but you would have to backup any important documents etc before restoring to an earlier date, or retrieve them from your incremental disc image backup after you have restored your computer to an earlier date.
This is how I believe or understand disc image backups to work and would appreciate if Cloudeight would verify or correct me on this subject, as I would like to have it right, as I know we can trust Cloudeight to have it right.
Also, does Windows 7 backup set date/time points at each backup interval?
I would be inclined to make a disc image backup of my computer when I had all the programs setup and running how I would like and keep that backup “as is” for future use, if needed, and then start a separate disc image backup, set to do incremental backups to protect all my work/data etc. Again, that may not be necessary. Cloudeight may wish to advise on that thought also! Regards, Jeff.